Monday, October 30, 2017

My Kind of Person

Hello again!  It's time for another Color Challenge at Splitcoaststampers and this week Barbara has chosen the colors Hello Honey, Tempting Turquoise, Pear Pizzazz and Rose Red, and "dessert" is to watercolor.  No diet for me this week, I chose to include dessert with my card.  I did substitute Distress Ink colors for the Stampin' Up colors, so they are not identical but I came pretty close for the most part.


I began by heat embossing the large Kind Flowers floral image on watercolor paper, then water coloring very simply, starting light then going back and adding a bit of darker color.  Once the flowers and leaves were dry, I used the turquoise ink to color the word "Kind" and add a wash around the image.


The panel was trimmed down, the scallop border added, then it was popped up on the Tempting Turquoise card base with foam tape.  I applied distress ink directly to paper, dried it thoroughly then heat embossed the remainder of the sentiment in gold.  I hand cut the words from paper, intentionally making them a bit wonky, then added them to the card front with foam tape.  Tonic Nuvo Crystal Glaze, very similar to Glossy Accents, was added to the middle of all the flowers except the yellow ones, where I added Simply White Crystal drops.  I also covered the large "Kind" first with Clear Wink of Stella then with the Crystal Glaze.  Sparkling Clear Sequins were the final addition to my card.


That's it for tonight!  Thanks so much for visiting and commenting, it's always so appreciated.  I've added a link to the SCS Color Challenge, so I hope you'll use it to check out all the inspiration and join us this week!


Stef


Product details
Stamps:  Kind Flowers (Simon Says Stamp November 2017 Monthly Card kit)
Paper:  Tempting Turquoise, Pear Pizzazz, Neenah Solar White, Canson XL watercolor
Ink:  Fossilized Amber, Worn Lipstick, Picked Raspberry, Shabby Shutters, Peacock Feathers, Versmark
Other:  Tonic Nuvo Simply White Crystal Drops and Crystal Glaze, Stitched Rectangle Scallop Edge Framelit (MFT), Pretty Pink Posh Sparkling Clear sequins

Sunday, October 29, 2017

Kind Flowers

Hello, crafty friends!  Tonight I'm sharing the second card I made with the latest monthly card kit from Simon Says Stamp (I posted the first one here yesterday).  I've used the great sketch from the current Sunday Stamps challenge for my card design.


The kit includes some beautiful patterned paper that worked perfectly for this layout, as did the sentiment.  I started with a piece of the beautiful floral paper cut to 4 1/4 x 5 3/8" and adhered to a same size piece of white card stock to give it more substance because I knew I would be wrapping it with twine and popping it up on the card base with foam tape.  The patterned paper for the pink heart strip and flag are from the same collection as the background piece. 


I thought Fresh Fig would go nicely with the muted colors of the papers, so I stamped the large word "kindness" on a strip of Whisper White card stock in Fresh Fig ink, and heat set the remainder of the sentiment with gold embossing powder on a strip of the card stock.  Once the sentiment pieces and the Crumb Cake twine were added to the panel it was adhered to the Fog card base.  Bright Gold Nuvo drops added the final touch.


Thanks so much for visiting and commenting, it's always so appreciated!  Please be sure to use the link above to the challenge blog and enjoy all the beautiful inspiration!


Stef


Product details
Stamps:  *Kind Flowers (SSS)
Paper:  Whisper White, Fresh Fig, Fog (SSS), *Pebbles Heart of Home Collection Patterned Paper
Ink:  Fresh Fig, Versamark
Other:  Hero Arts Gold Embossing Powder, Tonic Nuvo Bright Gold Crystal Drops, Crumb Cake Thick Baker's Twine (from a retired SU card kit)


*Included in the November 2017 SSS Card kit.  The SSS monthly kits do sell out pretty quickly but as of this post this one is still available

Saturday, October 28, 2017

Kindness

Hi there, and welcome back!  I had some fun yesterday using the latest card kit from Simon Says Stamp that just arrived in my mail box on Thursday.  I've made a couple cards from the kit already, and I'm sharing the first in this post.  I used the wonderful sketch from Freshly Made Sketches as my design inspiration.

This card is rather unique for me because there was no stamping involved on the exterior.  Instead I used pretty stickers from the kit, along with lovely patterned paper and gold leaf "sequins", all of which made this a fairly quick card to make.


I started with bright green card base, then added a panel of ivory card stock.  The piece of patterned paper was added to a slightly larger panel pale purple card stock, then adhered to the panel.  The bright green cross panel was first die cut with a stitched rectangle die then adhered with foam tape.  One of the pretty floral stickers was added after using glue dots to add the gold leaves on the underside, and the sentiment sticker was then adhered at the opposite end of the panel.


For the interior I stamped one of the lovely sentiments from the Kind Flowers stamp set (as part of the card kit) on a piece of white card stock, then adhered a leftover strip of the patterned paper.  Truly, this kit is one of my favorites because of the heart warming sentiments in the stamp set.


Thanks for visiting and commenting, it is always so appreciated!!  Be sure to use the link above to the FMS challenge and check out all the beautiful inspiration.


Stef


Product details
Stamps:  Kind Flowers (SSS Nov 2017 Card Kit)
Paper:  SSS:  Ivory, Green Apple, Pebbles Heart of the Home patterned paper (Nov 2017 card kit); Wisteria Wonder (Stampin' Up)
Ink:  Versafine Onyx Black
Other:  Stitched Rectangle die (SSS), Pebbles Heart of the Home sticker collection (SSS November 2017 Card Kit), Tonic Nuvo Simply White and Apple Green Crystal Drops, Metallic Sequins (SU)

Thursday, October 26, 2017

Thanksgiving Wishes

Hello again!  This week The Paper Players has a wonderful sketch for their weekly challenge and I just had to join in.  I love this challenge blog but for the past several weeks have had conflicts and other commitments that did not allow me the time to play along, so I was happy things finally worked out this week.


PP 367


I still need several Thanksgiving cards so I used this sketch to add to the completed pile.  I started with a panel of Crumb Cake card stock, sponge daubers, Distress Inks and a Tim Holtz Autumn Layering Stencil.  I move the stencil around the panel, inking blending the leaves with the daubers until I was satisfied with the design.  I mixed some White Gouache paint on an acrylic block with some water and flicked it onto the panel, letting it dry while I fussy cut a couple extra leaves and created the other card components.


When the white paint dried, the panel was layered on a white cardstock base, the Pumpkin Pie banner adhered over it, then a die cut circle over that.  After fussy cutting the leaves, I layered them with the help of a couple Mini Dimensionals on the lower portion, tied them together at the top with Linen Thread then adhered them onto the white circle.  The word "happy" was die cut twice, once with white and once with Cherry Cobbler card stock and layered for a shadow effect, so the red sentiment would show up better against the stenciled background.  I searched all my stamp sets for a small version of the word Thanksgiving and finally remembered there was one in the old Stampin' Up workhorse stamp set Teeny Tiny Wishes.  The final touch was adding the cute little wood acorn embellishments.


Thanks for taking the time to visit, it's always so appreciated.  I've added a link above to the challenge, so be sure to head over there and enjoy all the beautiful inspiration!


Stef


Product details
Stamps:  Teeny Tiny Wishes (SU)
Paper:  Neenah Solar White, Crumb Cake, Old Olive, Cherry Cobbler, Textured Pumpkin Pie
Ink:  Distress Inks:  Candied Apple, Carved Pumpkin, Crushed Olive; Old Olive
Other:  Tim Holtz Autumn Layering Stencil, Happy sentiment die (Lawn Fawn), Stitched Shape Circle Framelit (SU), Stitched Rectangle die (Simon Says Stamp), Linen Thread, retired wood acorn embellishments (SU), White Gouache

Monday, October 23, 2017

Happy Halloween

Hi there and welcome back!  Tonight I'm the host for this week's Color Challenge at Splitcoaststampers and I've chosen colors that I love using to make Halloween cards - Blackberry Bliss, Tangelo Twist, Daffodil Delight and Black.


I made two cards using the All Hallows Eve stamp set from Inkadinkado.  I have to admit I have had this set for a few years and never used it because it was a clear set and I wasn't very proficient at getting good images, having typically used rubber stamps.  But having a Misti changed that, as I was able to stamp the images multiple times to get good ink coverage.  Woo Hoo!


For this first card, I started by stamping the lovely flying witch and sentiment on Bristol with Versamark ink, then heat setting with black embossing powder.  Next I punched out a circle from a Post It note for the moon mask, then set about ink blending with sponges and the challenge colors.  After the panel dried it was cut with a Stitched Rectangle die.  I still felt it needed a little something more, so I pulled out the bats from the Stampin' Up Spooky Fun stamp set and heat set them below the moon.  After layering the panel on Tangelo Twist it was added to the black card base, and decorated with a few Nuvo drops.


On a panel of watercolor paper, the pumpkin and sentiment were heat set with black embossing powder.  I decided to wanted watercolor this card and used Distress Inks similar to the challenge colors.  The pumpkin was watercolored first, then once dried, I added Fossilzed Amber, Carved Pumpkin and Seedless Preserves to the wet paper around the pumpkin, letting the inks move and blend in the clear water.  Once it got to a point that I was happy with, I used my heat tool to dry it so I could sponge Black Soot ink around the edges.  The card was finished with trimmed down sections of a Spider Web doily and some Nuvo drops.


Thanks so much for visiting, it's always appreciated!  I've added a link to the challenge above so I hope you'll head over there and check out all the wonderful inspiration, and join in if you have a chance!


Stef


Product details
Card #1
Stamps:  All Hallows Eve (Inkadinkado), Spooky Fun (Stampin' Up)
Paper:  Basic Black, Tangelo Twist, Strathmore Bristol
Ink:  Daffodil Delight, Tangelo Twist, Blackberry Bliss, Versamark, Black Soot Distress Ink
Other:  Black embossing powder, 1 3/8" Circle punch, Tonic Nuvo Violet Galaxy Crystal Drops, Stitched Rectangle die


Card #2
Stamps:  All Hallows Eve (Inkadinkado)
Paper:  Basic Black, Canson XL
Ink:  Pumpkin, Fossilized Amber, Seedless Preserves, Black Soot
Other:  Black embossing powder, Tonic Nuvo Violet Galaxy Crystal Drops, Spider Web doily (SU)

Sunday, October 22, 2017

Christmas Scene

Hello and welcome back!  I've had loads creating a Christmas scene, something that is definitely not my normal type card.  I've used the awesome sketch for the current challenge at Freshly Made Sketches for my card design.


For this card I used the My Monthly Hero October 2017 kit from Hero Arts (kit is sold out but add-ons are still available).  The stamp set has a plethora of cute images for all sorts of Christmas scenes, plus lovely papers that I've also incorporated into my card.  I started by stamping a number of the images on Bristol paper, then colored them with Zig markers and a small paint brush.  The kit has a number of companion dies but not for all the images, so I fussy cut the images without dies.


After all the images were ready, I die cut a white card stock circle for the base, ink blended the sky with Distress Oxide and splattered with water.  I assembled the pieces, including a hillside out of decorative paper that looks like snow included in the kit and another from white card stock that had previously been sprayed with shimmer spray.  I used Stitched Shape Circle framelits in two sizes to create a frame, then all the pieces were added to the base circle.


After embossing a panel of Emerald Envy card stock with the Cable Knit embossing folder, it was layered onto a white card stock base then the strip of glitter paper, circle scene and sentiment were all added.


Thanks for visiting, it's always so appreciated.  I've added a link to the challenge above, so be sure to head over there and enjoy all the beautiful inspiration!


Stef


Product details
Stamps:  MMH October 2017 kit (Hero Arts)
Paper:  #80 and #110 Neenah Solar white, Emerald Envy (SU), Strathmore Bristol, MMH Oct 2017 kit decorative papers
Ink:  Versafine Onyx Black, Versamark, Distress Oxide - Broken China, Salty Ocean, Encore Silver and Gold,
Other:  Stitched Shapes Framelits (SU), Stitched Hillside Borders (Lawn Fawn), Pilot White Gel pen, Hero Arts White Embossing Powder, MMH Oct 2017 companion dies, SU Cable Knit 3D Dynamic embossing folder, Zig Markers

Friday, October 20, 2017

Sledding All The Way

Hello and welcome back!  Tonight I'm sharing a card made for the current challenge Stamp Ink Paper, where we get to play Tic-Tac-Toe!  I always love these type challenges, with lots of design choices.  For my card, I went with the top line using a leaf, sequins and die cut.


To start, I used Distress Inks to create an ink blended background of blues and violet on a white card stock panel.  It was splattered with water drops, then again with white Gouache.  While that dried I took another white card stock panel and die cut it with the Striped Leaf Cover die, then sprayed it with Shimmer spray (unfortunately I was unable to capture the sparkle in my photos).  After both panels dried the die cut was adhered over the ink blended panel.


Next, blue card stock was cut with a Banner Framelit and a sentiment and snowflakes from the latest My Monthly Hero kit were heat set with silver embossing powder.  Another image from the kit, the dog sled, was stamped on Bristol paper, colored with Zig Markers and die cut with the companion die.  I took that same die, traced around the outside of it with a pencil, fussy cut it then layered the stamped image.  I did this so it would stand out better against the background.  For the last addition to the card, a few of the cute Pixie Dust sequins from Simon Says Stamp were adhered.


Thanks for visiting, it's always so appreciated!  Be sure to use the link above and check out the challenge and all the wonderful inspiration!


Stef


Product details
Stamps:  Hero Arts October 2017 My Monthly Hero kit
Paper:  Neenah Solar White, Island Blue, Smoke (both SSS), Strathmore Bristol
Ink:  Versafine Onyx Black; Versamark;  Distress Inks:  Salty Ocean, Broken China, Wilted Violet
Other:  Striped Leaf Cover die (Altenew), Hero Arts MMH Kit Companion die, Banners framelit (SU), Sheer Shimmer Sparkle Spritz, White Gouache, Hero Arts Silver Embossing Powder, Pixie Dust sequins (SSS), Zig Clean Color Real Brush Markers (Cobalt Blue, Light Gray, Gray, Flesh, Mustard)

Thursday, October 19, 2017

OCC Gold Gatefold

Hi there!  Welcome back to my blog.  I have one last card to share for the OCC Merry Making classes.  This is one I completed for Jennifer McGuire's Day 4 class.  Here's a link to an earlier post with more information about OCC and a link to the OCC Home Page.  I just have to add that if you have not taken an OCC class, you NEED to check it out.  They are reasonably priced and provide superior technique videos and ideas that you are able to visit for a lifetime.  An excellent value and a tremendous resource for learning.


As you can tell by the title, this is a gatefold card.  There are some other nuances and surprises that you can learn if you take the class, however I will tell you that there are sentiments on the interior.  The die cut "gate" was made using the Doodled Lace Cover die from Altenew, and the cute heat embossed Christmas tree at the center and behind the red bow is from the now sold out October 2017 My Monthly Hero kit.  Zig markers were used for coloring the tree.


Thank you for visiting, it's always so appreciated!


Stef


Product details
Stamps:  October 2017 My Monthly Hero kit
Paper:  Neenah Solar White, Brushed Gold (ret. SU)
Ink:  Versamark
Other:  Zig Clean Color Real Markers, Hero Arts Gold Embossing Powder, Layering Scallop Circle Framelit (SU), Doodled Lace Cover die (Altenew), Rhinestone, ribbon from my stash

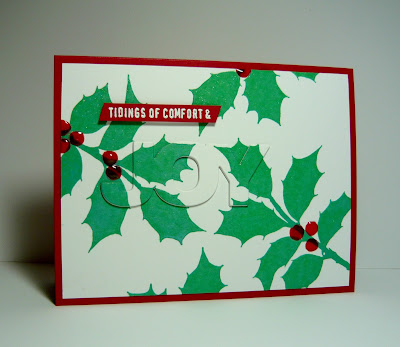
OCC Tidings of Comfort & Joy

Hi there!  Welcome back to my blog.  I have another card to share that I completed for Julie Ebersol's Day 4 class at Online Card Classes.  Here's a link to an earlier post with more information about OCC and a link to the OCC Home Page.


For today's card I started by stamping a holly branch stamp with Lucky Clover Distress Oxide ink on a panel of white card stock.  I wanted some really good coverage of this solid stamp, so using the Distress Oxide Ink and my Misti (so I could stamp the image 2-3 times) resulted in the desired look.  I wanted to add some holly berries but the holly branch is a single stamp and I didn't have another other "berry" stamps or even single small circles.  Sooo, I got creative and used the end of a pencil eraser inked up with Candied Apple DO ink and it worked great!  Once the ink was dry (helped with use of my heat tool) I die cut the "JOY" sentiment from it.


Because DO inks result in a chalky finish and I wanted more sparkle and shine, Clear Wink of Stella was added to all the holly leaves and Glossy Accents to all the berries.  Unfortunately it was really hard to capture with my camera, but you can see a bit of it in the photo below.  The card was finished with the addition of a white heat set sentiment and added to a red card base.


Thanks for taking time to visit, it's always so appreciated!


Stef


Product details
Stamps:  Holly Branch (Impression Obsession), Tim Holtz 2017 Stamptember Collection (stamped sentiment)
Paper:  Neenah Solar White, Real Red (SU)
Ink:  Versamark; Distress Oxide:  Lucky Clover, Candied Apple
Other:  Holiday Words die by Julie (Ellen Hutson), Clear Wink of Stella, Ranger Glossy Accents

Monday, October 16, 2017

Heartfelt Hugs


Hello again!  It's Monday night and time to reveal the new Color Challenge at Splitcoaststampers.  This week Karen is our host and has chosen the lovely combination of Powder Pink, Soft Sky, Wild Wasabi and So Saffron.  Dessert is to use scallops, which I chose not to use.

CC657
For my card, I kept it simple.  While the colors just scream for flowers, I have been focusing more on Fall and Christmas cards and just could not find the inspiration to go there.  Instead, I made a blended background for a card that sends love and hugs.


I substituted Distress Inks (listed below) for the challenge colors and used a Tim Holtz Ink Blending tool to add the colors to a panel of Strathmore Bristol, which was die cut with a Wonky Rectangle die (SSS).  Next I decided to pop up the "Hugs" die cut sentiment for some additional interest (you can find a tutorial here on SCS).  The rest of the sentiment is from the Heartfelt Sentiments stamp set from Altenew.  It's actually a longer sentiment but I performed "surgery" and carefully cut it down to just the two words I needed (it doesn't hurt your stamp, they will still line up perfectly if you want to use the entire sentiment), stamped with Versamark on black card stock and heat set with white embossing powder.  I also added some Clear Wink of Stella over the die cut words for a bit of additional sparkle, plus a few scattered sequins.


Thank you so much for visiting and I hope you have an opportunity to visit the SCS Color Challenge and even play along!  I've added a link above so be sure to check it out.


Stef


Product details
Stamps:  Heartfelt Sentiments (Altenew)
Paper:  #110 Neenah Solar White, Basic Black (SU), Strathmore Bristol
Ink:  Versmark; Distress Inks:  Mowed Lawn, Scattered Straw, Tumbled Glass, Spun Sugar
Other:  Script Words die (Altenew); Wonky Rectangle die (Simon Says Stamp); Sequins:  Rainforest (SSS), Sparkling Clear (Pretty Pink Posh); Tim Holtz Ink Blending Tool, Hero Arts White Embossing Powder, Clear Wink of Stella

Saturday, October 14, 2017

OCC Winter Post

Hi there crafty friends!  I'm back with yet another card for the Merry Making class at Online Card Classes.  This technique was from Cathy Zielske on Day 1.  I've done a number of posts recently with cards for these classes (and will have at least two more to share in the next few days) so thanks for sticking in there with me.  Here is a link to the first post with a bit more information and link to the OCC home page.


For this card, I created a ink blended background with three different green Distress inks going from light to dark, splattered the panel with water and dried with a paper towel, then flicked with gold metallic watercolor paint.  Next a panel of white card stock was cut with the Polygon Cover plate die, painted with Clear Wink of Stella, then adhered to the dried ink blended panel, then the entire thing was added to a Mint card base.


For the tag, the beautiful stag image was first heat set with gold embossing powder and die cut with a Banners framelit.  A hole was punched at the top with a hand held 1/8" punch, then two strands of Gold Cord was laced through.  The sentiment was added across the bottom and gold sequins were adhered.  This is a pretty simple card, the hardest part was making sure to line up and adhere the cover plate die to the ink blended panel.


Thanks for looking and be sure to check back in the next few days for some more Merry Making cards!


Stef


Product details
Stamps:  Winter Post (Stampin' Up), Tim Holtz 2017 Stamptember Collection (Simon Says Stamp)
Paper:  Neenah Solar White, Mint (SSS), Strathmore Bristol
Ink:  Distress:  Cracked Pistachio, Evergreen Bough, Pine Needles; Versmark; Tranquil Tide (SU)
Other:  Polygon Cover Plate die (Neat & Tangled), Banners Framelit (SU), Gansai Tambi Starry Colors Watercolor paints, Gold Cord, Hero Arts Gold Embossing Powder, Clear Wink of Stella

Friday, October 13, 2017

OCC New Leaf

Yup, another post for an Online Card Class, this one for a Day 3 technique class from May Park.  If you have not seen my other posts with my OCC cards this week, here is a link to an earlier post with a bit more info and a link to the OCC home page.


For this card I pulled out a seldom used (by me) Paper Trey Ink stamp set called Turning a New Leaf.  I purchased this set many years ago (it may now be retired) but didn't use it much because I was not very proficient with stamping clear stamps, using primarily Stampin' Up rubber stamps.  Boy has that changed LOL, plus now that the Misti is available, getting a good stamp impression with most stamps is now actually achievable!  Anyway, I digress.  Here's the card I made for May's technique.


I made a monochromatic, non-traditional Christmas card using Stampin' Up's Sweet Sugarplum card stock and ink.  I started out by stamping the sentiment in the middle along with the little dotted circles around the edges, then heat set it all with silver embossing powder.  Next, the sentiment was encircled with various leaves and fronds, stamped multiple times in Sweet Sugarplum inks before moving on to the next image. 


When the panel was finished, it was adhered to a heavy weight card base.  With a white gel pen, I went around the panel and added white dots for some additional interest to finish off the card.  This is one of May's signature designs and I think it adds a delightful element!


As always, thanks for visiting!


Stef


Product details
Stamps:  Turning A New Leaf (PTI), Halftone Holidays (Altenew), Balloon Celebration (Stampin' Up)
Paper:  Neenah Solar White, Sweet Sugarplum
Ink:  Versamark Sweet Sugarplum
Other:  Hero Arts Silver Embossing Powder, Uniball White Gel pen, Misti

OCC Woodland Holidays

Hi there, I have another post for a card made for the Online Card Classes (for more info and a link see this post here).  Today's classes were about water coloring, which I love to do.  I created a couple of cards using the new Winter Woodland Wonders stamp set from Avery Elle and am sharing one of them in this post.


Aren't those images adorable?  I had so much fun creating this simple scene with these cute critters and the pretty tree...I was going to say birch or aspen but obviously the stamp has holly leaves attached so we'll just go with "pretty tree".  ;-)  I used Distress Oxide inks to both watercolor the images and create the sky in the background.  It was the first time I'd used them to watercolor small images and I have to say that I prefer regular Distress Inks, but I will certainly give it a try again.  After all the images were dry, they were cut with the stamp set companion dies.


After ink blending the sky, white Gouache was flicked all over to add some "snow", dried, then the sentiment was stamped with the help of a Misti.  The die cut snowy hill was adhered to the bottom after being sprayed with some pretty Shimmer spray.  Next the tree and ornament were glued directly to the panel, with the bunny and deer popped up next to the tree with foam tape.  Last touches were to add Nuvo Crystal Glaze to all the holly berries and the ornament, and Clear Wink of Stella to the scarves.

Thanks for taking time to visit!

Stef


Product details
Stamps:  Winter Woodland Wonders (Avery Elle)
Paper:  Neenah Solar White, Strathmore Bristol, Ranger Watercolor
Ink:  Versmark Onyx Black; Distress Oxide:  Antique Linen, Candied Apple, Peeled Paint, Broken China, Salty Sea, Iced Spruce, Vintage Photo, Frayed Burlap, Worn Lipstick; Encore Gold Metallic
Other:  White Gouache, Tonic Nuvo Crystal Glaze, Sheer Shimmer Sparkle Spritz, Lawn Fawn Stitched Hillside Borders, Clear Wink of Stella

Thursday, October 12, 2017

OCC Celebration

I'm back once again with another card for the Online Card Classes.  Information about the class and a link to the OCC home page can be found here . 


This card should really be titled "Total Disaster Averted" ha ha, because it was certainly a challenge to get completed, just because of mostly self inflicted errors in the creative process.  But I finally arrived at a place where I was good with the end result, after the first two attempts ended up in the trash...  Hey, it's part of the creative process sometimes, right?  ;-) 


Lots of embossing on this card, first the background then the holly leaves and berries on top of that.  When that portion was complete, a small bit of embossed "snow" was added to the background


The holly stamp is a single branch and without berries.  So I used a Versamark marker to create the berries then heat set them with Cherry Cobbler embossing powder.  They still seemed a little flat so I added Glossy Accents to make them shinier.


For the die cut sentiment, I cut the word "Celebrate" three times from white card stock, glued them atop one another, then used Clear Wink of Stella on the top to add sparkle.  Then I decided to make it glossy as well, so Tonic Nuvo Crystal Gloss was layered on top.  You can see it better in the photo below.  The second part of the sentiment was stamped on a strip of Cherry Cobbler card stock and heat embossed with gold embossing powder and a little heat embossed "snow" added to the top edge.  Both were then added to a vellum circle which was then adhered to the panel with strong tape only behind the sentiments.  And, phew, this card was finished!


That's it!  So glad you took the time to visit!  It's always so appreciated!


Stef


Product details
Stamps:  Impression Obsession Holly Branch, October 2017 My Monthly Hero Card Kit
Paper:  110# Neenah Solar White, Cherry Cobbler (Stampin' Up), Vellum
Ink:  Versamark
Other:  Hero Arts Gold, Hero Arts White, Simon Says Stamp Steel Navy and Stampin' Up Cherry Cobbler embossing powders, Tonic Nuvo Crystal Gloss, Ranger Glossy Accents, Clear Wink of Stella, Stitched Shapes Circle Framelit, Stitched Rectangle die, MFT Celebrate die

Wednesday, October 11, 2017

OCC Woodland Peace

Hello again!  Tonight I'm sharing a 2nd card made for the Online Card Classes Merry Making class I'm taking this week.  I have more information and a link to the OCC Home Page on my prior post here.  Tonight's card is an ethereal looking Christmas card using the Tim Holtz 2017 Stamptember stamp set from Simon Says Stamp.


I started with the Sheet Music background stamp (SU), applying Ranger Pearl Metallic Acrylic Paint.  I deliberately did not fully cover the stamp with the paint before stamping on a panel of water color paper.  Next, various Distress inks were sponged sparingly on and around the panel before adding the tree and deer images.  When the ink was dry the panel was cut with a stitched rectangle die.  In order to create the sentiment die, I applied some Distress ink directly to a piece of the watercolor paper, used a heat tool to dry it, then die cut it.  To give it more of a distress look, I used a dark brown marker to go around all the edges, but I couldn't resist also adding a layer of Clear Wink of Stella to have some sparkle along with the distress.  ;-)  After adding the completed panel to the Fog card stock base, a bit of Linen Thread was wrapped around the top.


Thanks so much for visiting, it's always so appreciated!


Stef


Product details
Stamps:  Sheet Music bg (SU), Tim Holtz 2017 Stamptember Collection (SSS)
Paper:  Canson Montval watercolor, Fog (SSS)
Ink:  Distress:  Evergreen Bough, Hickory Smoke, Ground Espresso; Distress Oxide:  Iced Spruce, Frayed Burlap, Walnut Stain
Other:  Christmas Greetings die (SU), Ranger Pearl Metallic Acrylic Paint, Stitched Rectangle die (SSS), Clear Wink of Stella, Linen Thread

Monday, October 9, 2017

OCC Lots of Snowflakes

Hello again, friends!  Tonight I have a card to share that I made for a class that I'm taking through the Online Card Classes (OCC Home Page).  This one is called Merry Making and it's all about the upcoming holidays.  If you've never taken a class through OCC I highly recommend it.  The owners and instructors (amongst many other amazing people) are Kristina Werner and Jennifer McGuire who are amazingly talented crafters that I admire tremendously.


My card is also for this week's new Color Challenge at Splitcoaststampers.  Robin is our host tonight and she has chosen the beautiful combination of Night of Navy, Bermuda Bay and Rich Razzleberry.  This combo ended up working perfectly for my OCC card.


In addition, I'm joining the Simon Says Stamp Wednesday Challenge where this week the theme is to make a Christmas card.


Because this is a paid class, I'm not going into much detail but will share a couple of photos.  Obviously the Bokeh technique is used (but there is a slight twist) and snowflakes were heat embossed to create a snowy holiday card.


The sentiment and 1/4" edge were cut from Glimmer paper to add some sparkle.  I substituted Faded Jeans, Peacock Feathers and Seedless Preserves for the Stamping Up ink colors, which are a really close match.


A little close up to see those pretty heat set snowflakes.


Thanks for looking and be sure to head over to SCS to enter this week's Color Challenge, using the link above.  Trust me, there will be some amazing inspiration!


For OCC, while you can't join the Merry Making interactive, live class at this point, you will be able take the class independently later this month plus there are a number of other great classes available on an independent basis.


Stef


Thursday, October 5, 2017

Written in the Stars

Hello again!  I fell in love with the Galaxy background technique that was quite the rage in the last year or two but haven't had time to really play around with it until recently, when I made two cards using the beautiful Written in the Stars stamp set and dies from MFT.  If you're not familiar with how to make it, there are TONS of videos on You Tube, just use the search tool, but for these first two cards that I tried, I really pretty much CASEd Amy R (Prairie Paper and Ink) in this awesome video Amy R Galaxy Video


Both cards were created with blue, purple and black watercolor paints on watercolor paper but for the card above I used a lot more black than the card below.  I also dropped in a greater amount of a light shimmery watercolor paint from the Gansai Tambi Starry Colors Metallic watercolors while the paints were still wet.  I used a heat tool to dry them, then sprayed them both with Perfect Pearls mixed with clear water in a mister.  When the panels dried from that step, I put a small amount of white Gouache on an acrylic block, added a small amount of water from the mister, then used a paint brush to flick the paint on the panels, essentially creating the "stars".


After die cutting the panels with stitched rectangle dies, they were mounted with foam tape on black card bases.  Next the respective small sentiments were heat set with white embossing powder on strips of black card stock.  Using Silver Foil paper, the large sentiment and small stars were die cut then adhered to the watercolor panel.


It's difficult to take pictures of metallic paper, and this card was no exception, but you can see how beautiful that background turned out.  Such a fun technique!  I also love this MFT stamp set with so many inspirational sentiments for many occasions.


Thanks for visiting and commenting, it's always so appreciated!


Stef


Product details
Stamps:  Written in the Stars
Paper:  Neenah Solar White, Basic Black, Silver Foil, Canson XL watercolor
Ink:  Versamark
Other:  Sakura Koi and Gansai Tambi Starry Colors Metallic Watercolor paints, Stitched and Wonky Stitched Rectangle dies, Shining Stars companion dies, #8 round Silver Black Velvet paint brush, White Gouache, Ranger Perfect Pearls

Monday, October 2, 2017

Prayers & Hugs

ETA:  I'm having trouble with Blogger posts and I'm not able to correct the large spaces between paragraphs and photos.  Sorry for the weird appearance of this post and please let me know if you're experiencing any similar issues and any fixes you may have found.  Thanks!  Stef


Welcome, crafty friends!  I have a card for you that was made for this week's Color Challenge at Splitcoaststampers and for the current Autumn Floral Theme challenge at The Paper Players.  For the color challenge, Mary Marsh is our host and she has chosen Peekaboo Peach, Lemon Lime Twist and Early Espresso as her colors.  "Dessert" is to create an autumn theme.


PP 364


I decided to use floral and leaf images from Adore You stamp set from Altenew.  I masked the center flower then stamped the smaller one and the leaves using Barely Beige from Simon Says Stamp, which was specifically created for "no-line" watercoloring.  Now, having said that, I have not had success with no-line watercoloring in my previous attempts (normally using heat embossed images), and while today's result was so much better than anything I'd done previously, I know I still need to practice further.  Still I'm happy with it.  I should also point out the Barely Beige ink doesn't just disappear, but instead absorbs the color of the ink or watercolor paint used with it, which you can see in the lines in the leaves and the shaded areas of the flowers.


I used Stampin' Up inks in the challenge colors, watercoloring alternate flower petals and leaves in order to avoid bleeding, plus periodically using my heat tool to speed up dry times.  After the center was watercolored and completely dried, I used a white gel pen to add dots to the end of the stamen.  Finally, very diluted Sahara Sand ink was lightly painted around the outside of the image.  A Misti was used to stamp the sentiment in Early Espresso ink, then the panel was wrapped with ribbon, adhered to an Early Espresso panel, then popped it all up on a peach card base.


Thanks so much for visiting and commenting, it's always so appreciated.  Be sure to use the links above and check out both challenges for some amazing inspiration!


Stef


Product details
Stamps:  Adore You, Heartfelt Sentiments (both Altenew)
Paper:  Peekaboo Peach, Early Espresso, Canson XL watercolor
Ink:  Peachaboo Peach, Lemon Lime Twist, Early Espresso, Sahara Sand, SSS Barely Beige
Other:  Early Espresso 1/8" Taffeta ribbon, Silver Black Velvet #4 round paint brush, White gel pen, Tonic Nuvo Morning Dew Crystal Drops and Orange Marmalade Jewel Drops, Pretty Pink Posh Sparkling Clear Sequins